2024. 12. 27. 02:22ㆍ프로젝트
개인 프로젝트를 진행하며 휴대폰 인증을 구현한 내용을 적어놓겠습니다.
버전
Spring boot: 3.3.4
Java: 17
로직 구현시 고려사항
1. 어뷰징성 요청 방지
메세지 전송에는 비용이 들어갑니다.
따라서, 의미없는 어뷰징성 요청을 방지하기 위해서 요청횟수에 제한을 둘 필요가 있습니다.
2. 인증문자 폐기
인증문자를 전송 후 인증 문자를 계속해서 사용할 수 없도록 전송된 인증문자를 파기할 필요가 있습니다.
인증번호 관리
위의 고려사항을 생각해서 인증번호를 어떻게 관리할지에 대해서 생각해봐야합니다.
인증번호를 관리하는 방식에는 여러가지 방법이 있습니다.
1. RDBMS
관계형데이터베이스를 이용해서, User 테이블 또는 인증번호 관리 테이블을 생성해서 인증번호를 관리합니다.
만료시간과 어뷰징 방지를 위해서 컬럼(예: timestamp, reqeust_cnt)을 사용할 수 있지만,
인증번호 폐기나 횟수 확인에 대한 관리가 복잡해질 수 있다는 단점이 있습니다.
2. 파일 시스템 기반 관리
JSON, CSV 등을 이용해 인증 로직을 처리할 수 있습니다.
하지만, 확장성이 좋지않고 속도가 느리다는 단점이 있습니다.
3. 메모리 기반 관리
마지막으로 Redis 등을 통해서 In-memory를 사용하는 메모리 기반 관리를 할 수 있습니다.
Redis는 TTL(Time-To-Live) 기능을 지원해서 인증 코드를 특정 시간 동안만 유지하고 자동으로 삭제합니다.
또한, 카운터와 시간 제한 기능을 결합해서 1시간에 5회 제한과 같은 기능을 구현할 수 있습니다.
In-memory 기반이기 때문에 서버가 재시작되면 데이터가 손실된다는 점이 있지만
인증코드와 같이 유효기간이 짧고 일시적인 데이터를 관리할 때는 크게 단점으로 작용하지 않습니다.
위와 같은점을 고려하여 저는 Redis로 인증번호를 관리하기로 하였습니다.
구현
1. docker에 Redis 컨테이너 띄우기
docker pull redis

docker run --name redis-container -p 6379:6379 -d redis
위 명령어로 Redis 최신 버전 이미지를 pull해서 컨테이너를 생성합니다.
2. 컨테이너 정상 동작 확인

Spring Boot와 Redis연결
1. 의존성 추가
gradle
implementation 'org.springframework.boot:spring-boot-starter-data-redis'
maven
<dependency>
    <groupId>org.springframework.boot</groupId>
    <artifactId>spring-boot-starter-data-redis</artifactId>
</dependency>
2. application.properties 설정
spring.data.redis.host=localhost
spring.data.redis.port=6379
spring.data.redis.timeout=6000
3. RedisConfig 생성
package com.tochookpi.tochookpi.config;

import org.springframework.context.annotation.Bean;
import org.springframework.context.annotation.Configuration;
import org.springframework.data.redis.connection.RedisConnectionFactory;
import org.springframework.data.redis.connection.jedis.JedisConnectionFactory;
import org.springframework.data.redis.connection.lettuce.LettuceConnectionFactory;
import org.springframework.data.redis.core.RedisTemplate;

@Configuration
public class RedisConfig {

    @Bean
    public RedisConnectionFactory redisConnectionFactory() {
        return new LettuceConnectionFactory();
    }

    @Bean
    public RedisTemplate<String, Object> redisTemplate() {
        RedisTemplate<String, Object> template = new RedisTemplate<>();
        template.setConnectionFactory(redisConnectionFactory());
        return template;
    }
}
Spring Data Redis에서 Redis와의 연결을 위한 클라이언트 라이브러리는 Lettuce와 Jedis로 2가지가 있습니다.
이에 대한 설명과 비교는 여기에 있으니 읽기를 추천합니다.
저는 Lettuce를 사용했습니다.
- RedisConnectionFactory: Redis서버와 연결을 생성하고 관리하는 역할을 담당
- RedisTemplate: 생성된 연결을 통해 Redis 서버와 통신하여 데이터를 편하게 다루기 위한 여러 메세드를 제공하는 역할
4. 서비스 로직 작성
package com.tochookpi.tochookpi.service;

import com.tochookpi.tochookpi.dto.PhoneVerificationDTO;
import org.springframework.data.redis.core.RedisTemplate;
import org.springframework.http.HttpStatus;
import org.springframework.stereotype.Service;
import org.springframework.web.server.ResponseStatusException;

import java.util.concurrent.TimeUnit;

@Service
public class AuthServiceImpl implements AuthService {
    private final RedisTemplate<String, Object> redisTemplate;

    public AuthServiceImpl(RedisTemplate<String, Object> redisTemplate) {
        this.redisTemplate = redisTemplate;
    }

    @Override
    public void sendVerificationCode(PhoneVerificationDTO phoneVerificationDTO) {
        String verificationCode = String.valueOf((int) (Math.random() * 1000000));
        phoneVerificationDTO.setVerificationCode(verificationCode);

        try {
            sendSms(phoneVerificationDTO);
            redisTemplate.opsForValue().set(
                    phoneVerificationDTO.getPhone(),
                    phoneVerificationDTO.getVerificationCode(),
                    5,
                    TimeUnit.MINUTES); // 5분간 유효
        } catch (Exception e) {
            throw new ResponseStatusException(HttpStatus.INTERNAL_SERVER_ERROR, "SMS 전송 실패");
        }
    }

    // SMS 전송 로직 (예시, 실제로는 외부 API 서비스 호출 처리)
    private void sendSms(PhoneVerificationDTO phoneVerificationDTO) {
        // 실제 SMS 전송 로직 구현 부분
        System.out.println("Sending verification code "
                + phoneVerificationDTO.getVerificationCode()
                + " to phone: "
                + phoneVerificationDTO.getPhone());
    }
}
랜덤한 verificationCode를 만들고, sendSms()를 통해서 SMS 전송로직을 실행시킵니다.
(SMS 전송 로직은 사용하는 서비스에 따라 다르므로 이용하는 서비스에 따라 구현을 합니다.)
SMS 전송 로직이 성공했다면 redisTemplate의 메서드를 이용해서 값을 저장합니다.

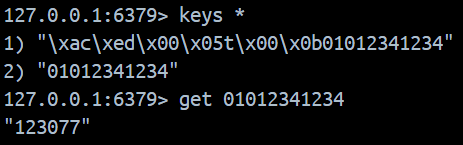
저장된 값을 확인하면 위와 같은 형태로 저장이 되어있는 것을 확인할 수 있습니다.
Spring Data Redis를 사용할 때, 기본적으로 RedisTemplate은 JDK 직렬화 방식을 사용합니다.
따라서, 키와 값이 바이너리 형식(예: \xac\xed\x00\x05t\x00...)으로 변환되어 저장됩니다.
이 형식은 사람이 읽을 수 없는 형태로 보이지만, 해당 데이터를 역직렬화하면 원래 값을 복구할 수 있습니다.
이를 읽기 편한 형태로 저장하기 위해서는 직렬화 방식을 변경해주면 됩니다.
package com.tochookpi.tochookpi.config;

import org.springframework.context.annotation.Bean;
import org.springframework.context.annotation.Configuration;
import org.springframework.data.redis.connection.RedisConnectionFactory;
import org.springframework.data.redis.connection.lettuce.LettuceConnectionFactory;
import org.springframework.data.redis.core.RedisTemplate;
import org.springframework.data.redis.serializer.StringRedisSerializer;

@Configuration
public class RedisConfig {

    @Bean
    public RedisConnectionFactory redisConnectionFactory() {
        return new LettuceConnectionFactory();
    }

    @Bean
    public RedisTemplate<String, Object> redisTemplate() {
        RedisTemplate<String, Object> template = new RedisTemplate<>();
        template.setConnectionFactory(redisConnectionFactory());

        template.setKeySerializer(new StringRedisSerializer());
        template.setValueSerializer(new StringRedisSerializer());
        return template;
    }
}
RedisConfig 클래스 파일을 위와같이 변경해주면
읽기 편한 방식으로 저장되는 것을 확인할 수 있습니다.
그리고 TTL 명령어로 데이터의 유효시간도 확인할 수 있습니다.

해당 시간이 지난다면 데이터가 사라져 자동으로 인증번호가 폐기됩니다.
@Override
public boolean verifyVerificationCode(PhoneVerificationDTO phoneVerificationDTO) {
    String storedVerificationCode = (String) redisTemplate.opsForValue().get(phoneVerificationDTO.getPhone());

    if (storedVerificationCode != null && storedVerificationCode.equals(phoneVerificationDTO.getVerificationCode())) {
        redisTemplate.delete(phoneVerificationDTO.getPhone());  // 인증 후 삭제
    	return true;
    }

	return false;
}
마지막으로 위와 같이 인증번호 확인 로직을 추가해주면 기본적인 로직 구현은 끝이 납니다.
5. 어뷰징성 요청 방지
어뷰징성 요청을 완벽하게 막을 수는 없겠지만, 최대한 막아보기 위한 로직을 추가해봅시다.
Redis의 INCR 명령어를 이용해 구현할 수 있습니다.
INCR [키값]을 입력하면 해당 키가 없다면 1로 생성하고, 키가 있다면 기존 값에서 1 증가시킵니다.
    @Override
    public void sendVerificationCode(PhoneVerificationDTO phoneVerificationDTO) {
        checkRequestLimit(phoneVerificationDTO.getPhone());
        String verificationCode = String.valueOf((int) (Math.random() * 1000000));
        phoneVerificationDTO.setVerificationCode(verificationCode);

        try {
            sendSms(phoneVerificationDTO);
            redisTemplate.opsForValue().set(
                    phoneVerificationDTO.getPhone(),
                    phoneVerificationDTO.getVerificationCode(),
                    5,
                    TimeUnit.MINUTES); // 5분간 유효
        } catch (Exception e) {
            throw new ResponseStatusException(HttpStatus.INTERNAL_SERVER_ERROR, "SMS 전송 실패");
        }
    }

    private void checkRequestLimit(String phone) {
        String limitKey = "verification:" + phone + ":limit";

        // 요청 횟수 증가 및 제한 초과 확인
        Long requestCount = redisTemplate.opsForValue().increment(limitKey);
        if (requestCount == 1) {
            // 최초 요청 시 만료 시간 설정
            redisTemplate.expire(limitKey, 1, TimeUnit.MINUTES); // 1분 제한 시간
        }

        if (requestCount > 10) { // 1분 동안 최대 10회 제한
            throw new ResponseStatusException(
                    HttpStatus.TOO_MANY_REQUESTS, "요청 횟수를 초과했습니다. 잠시 후 다시 시도해주세요.");
        }
    }
checkRequestLimit()를 추가해서 최대 요청 횟수를 제한하는 로직입니다.
Long requestCount = redisTemplate.opsForValue().increment(limitKey); 이 부분이 INCR 명령어와 동일한 동작을 수행합니다.
저는 60초안에 10번이 초과되는 요청이 온다면 어뷰징성 요청으로 확인해 에러메세지를 던져주었습니다.
물론, 휴대폰 번호를 바꿔가면서 또는 시간 텀을두고 요청을 보낸다면 위 로직으로는 막을 수 없지만 최소한의 방지를 위함입니다.
이렇게 Redis를 이용한 휴대폰 번호 인증을 구현하였습니다.
https://docs.spring.io/spring-data/redis/reference/
Spring Data Redis :: Spring Data Redis
Costin Leau, Jennifer Hickey, Christoph Strobl, Thomas Darimont, Mark Paluch, Jay Bryant Copies of this document may be made for your own use and for distribution to others, provided that you do not charge any fee for such copies and further provided that
docs.spring.io
'프로젝트' 카테고리의 다른 글
| [React] PrivateRoute 구현 (0) | 2025.02.21 |
|---|---|
| Axios Interceptor를 이용한 JWT 관리 (0) | 2025.01.08 |